
So you've got a brand new Lync Server 2013 setup along with Exchange Server 2013 SP1. Apart from creating users and configuring Lync and Exchange specific features, you also want to integrate the two servers for many better-together features. Most commonly this will include:
1. Leveraging Microsoft Exchange Server 2013 Unified Messaging for Microsoft Lync Server 2013 voicemail
2. Enabling the use of high-resolution photos in Microsoft Lync Server 2013
3. Configuring Microsoft Lync Server 2013 to use the unified contact store
4. Enabling Lync client features in Microsoft Outlook Web App 2013
Following the guidelines in TechNet are definitely useful but some essential steps are missing and since the information scattered around in different locations, this article provides 3 easy steps to get the pre-requisites configured correctly to prepare for configuring better-together features.
Step 1: Generate a new CA Certificate for Exchange
The default installation of Exchange automatically creates a self-signed certificate for Exchange services including IMAP,POP,IIS and SMTP. For Exchange UM to integrate properly with Lync we need to use a certificate issued by a CA that Lync trusts, which typically will be the enterprise CA that is part of the AD infrastructure. We can do this using the EAC under Servers->Certificates and click on the "New" button. This will bring up the new certificate request wizard. On the first screen select "Create a request for a certificate from a certification authority" and click next. Give the cert a friendly name and on the next screen do not use wildcard certificates as this may give problems when calling UM from Lync phone devices. Next store the certificate request on the CAS server. The next screen is important and will be highlighted here. Note that the SAN is automatically populated for accessing Exchange services from the Intranet but not external ones:
The default installation of Exchange automatically creates a self-signed certificate for Exchange services including IMAP,POP,IIS and SMTP. For Exchange UM to integrate properly with Lync we need to use a certificate issued by a CA that Lync trusts, which typically will be the enterprise CA that is part of the AD infrastructure. We can do this using the EAC under Servers->Certificates and click on the "New" button. This will bring up the new certificate request wizard. On the first screen select "Create a request for a certificate from a certification authority" and click next. Give the cert a friendly name and on the next screen do not use wildcard certificates as this may give problems when calling UM from Lync phone devices. Next store the certificate request on the CAS server. The next screen is important and will be highlighted here. Note that the SAN is automatically populated for accessing Exchange services from the Intranet but not external ones:
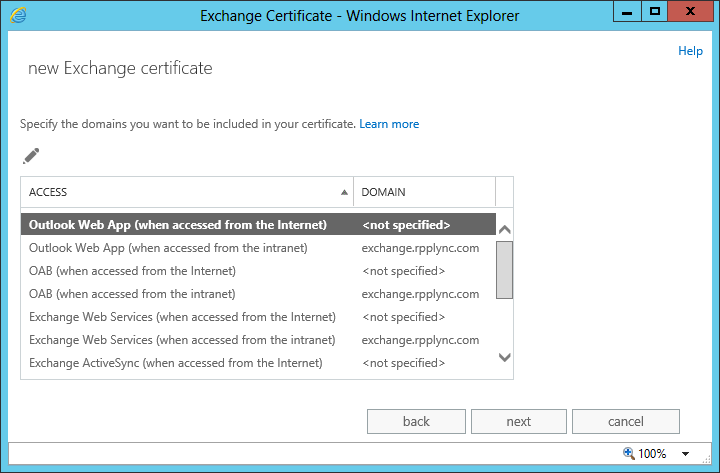
If we intend to allow Exchange services to be available to users on external networks then we should edit each of the services (when accessed from the Internet) to include a SAN. This will typically be "mail.yourdomain.com" and subsequently configured in the Reverse Proxy for external user access. We can use the same SAN for all Exchange services and once complete click next to finish the wizard. This will save the certificate request to a file share which can then be submitted to the Enterprise CA to generate a certificate. Once you get the certificate back from the CA, return to the EAC and click on "Complete Pending Request" to import the certificate back to Exchange. Finally assign all Exchange services including UM to use this certificate:
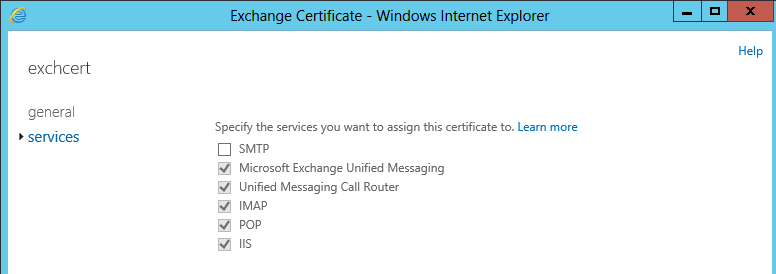
Assigning the certificate to Exchange UM and UM call Router services requires some additional steps. Both services by default uses a startup mode of TCP which causes the certificate assignment to fail. First stop the Exchange UM and UM Call Router services, and then configure both to use TLS startup on the EAC as shown below. Then assign both services to use the new certificate and start the services.

Step 2: Set the Autodiscover Internal URI
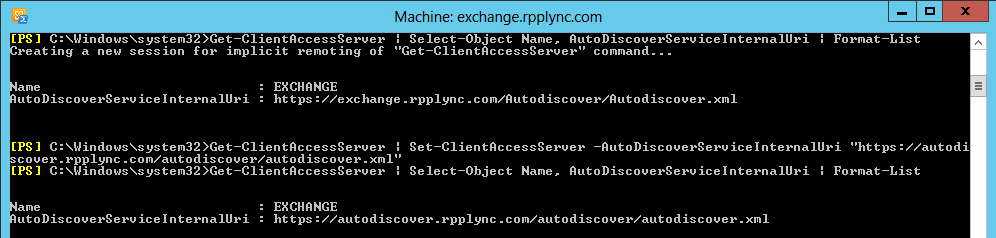
By default, Exchange will set the Autodiscover Internal URI to be the https//:<FQDN of Exchange CAS>/Autodiscover/Autodiscover.xml. In some cases this URI may even be blank. Either way this will cause various issues when configuring Exchange and Lync to be Partner Applications and so its highly recommended to set the URI to https://autodiscover.<yourdomain>/Autodiscover/Autodiscover.xml using the Exchange Management Shell as show below. Of course we must also not forget to create the autodiscover A record in the DNS.
By default, Exchange will set the Autodiscover Internal URI to be the https//:<FQDN of Exchange CAS>/Autodiscover/Autodiscover.xml. In some cases this URI may even be blank. Either way this will cause various issues when configuring Exchange and Lync to be Partner Applications and so its highly recommended to set the URI to https://autodiscover.<yourdomain>/Autodiscover/Autodiscover.xml using the Exchange Management Shell as show below. Of course we must also not forget to create the autodiscover A record in the DNS.
Step 3: Configure Partner Applications for Lync and Exchange
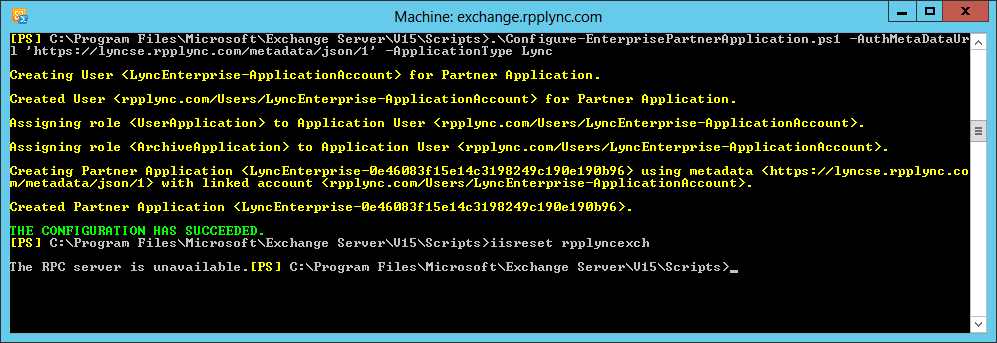
Now we're ready to configure Lync as a Partner Application for Exchange using Windows Powershell but first we should check that the URL for Lync Server authentication metadata document for is working. To do this simply open a browser on the Exchange server and navigate to https://<FQDN of Lync Server/metadata/json/1 and see if IE prompts you to open or save a file. If it does then it's working correclly. Next, Exchange provides a script to simply configuration of the Partner Application at C:\Program Files\Microsoft\Exchange Server\V15\Scripts. From that directory run the Configure-EnterprisePartnerApplication.ps1 script with the Lync metadata doc URL as shown below. Then restart IIS and this step will be complete.
Now we're ready to configure Lync as a Partner Application for Exchange using Windows Powershell but first we should check that the URL for Lync Server authentication metadata document for is working. To do this simply open a browser on the Exchange server and navigate to https://<FQDN of Lync Server/metadata/json/1 and see if IE prompts you to open or save a file. If it does then it's working correclly. Next, Exchange provides a script to simply configuration of the Partner Application at C:\Program Files\Microsoft\Exchange Server\V15\Scripts. From that directory run the Configure-EnterprisePartnerApplication.ps1 script with the Lync metadata doc URL as shown below. Then restart IIS and this step will be complete.
Next we do the same on the Lync server side ie configure Exchange as a Partner Application for Lync. Again before doing so it's good to verify that the Exchange metadata document URL is working. Simply open IE on the Lync server and navigate to https://autodiscover.<yourdomain>/autodiscover/autodiscover.svc. A prompt should appear asking for credentials and after entering that a WSDL page should be shown. Next we open the Lync Management Shell and run the Set-CsOAuthConfiguration command as shown below. If there are no errors returned then we are good to go

Conclusion
With Exchange and Lync now configured as Partner Applications for each other, we can proceed to configure all the better together features mentioned in the beginning of this article. Each feature can be configured independently and the steps are provided in TechNet and shown below for reference:
Configuring Microsoft Lync Server 2013 to use the unified contact store
Configuring the use of high-resolution photos in Microsoft Lync Server 2013
Configuring Microsoft Exchange Server 2013 Unified Messaging for Microsoft Lync Server 2013 voicemail
Integrating Microsoft Lync Server 2013 and Microsoft Outlook Web App 2013