Quantcast
Channel: Lync News
Viewing all 4272 articles
Browse latest View live

Script: Query Front Ends for Specific Event Log ID’s

$
0
0

I was troubleshooting today with my main Lync man “JP” (who chooses to remain anonymous). Part of our troubleshooting was checking against 6 (and sometimes 12) front ends to see if a specific Event ID appeared in Event Viewer. This was tedious, going to each server and then a lot of them getting no results.

JP said “there should be a script to do this for us”.

And from that comment this script was born. It’s possible someone has already written this script. We didn’t bother looking since it is a fairly simple script. If someone has written this, then let me know and I will give you credit.

The script – Get-CsEventID – is pretty simple. There are 2 mandatory parameters:

-Pool is the name of your Lync pool which is then sent to Get-CsSite to get the names of each of the servers in your pool

-EventID is the Event ID for which you are looking.

The two optional parameters are:

-LogName By default the script searches in the “Lync Server” log but setting this will let you search against other logs like Application or System

-StartTime If you want to limit your search to the past few hours or days, then set StartTime to the number of hours you want to go back. By default, this is set to 72, so it will search back for the past 3 days.

Here are 2 examples:


.\Get-CsEventID -Pool skypepool.flinchbot.com -EventID 12288

This will search for Event ID 12288 across the skypepool.flinchbot.com pool. It will search for the past 72 hours for this entry.


.\Get-CsEventID -Pool skypepool.flinchbot.com -EventID 6005 -LogName "System" -StartTime 4

This will search the same pool, but now for EventId 6005 in the System log. It will search back the past 4 hours.

Note that Windows Firewall will need to permit access to remote event logs. You can run the following on a Windows 2012 or later server to enable this.


Get-NetFirewallRule | where DisplayName -like  '* Event Log*' | Enable-NetFirewallRule

Grab the script here.


JaapWesselius.com: Upgrade Lync 2013 to Skype for Business 2015 Step-by-Step

Lee Desmond: Lync 2013 Operations Checklists (Apr2015)

$
0
0
Lync 2013 Operations Checklists - [version Apr2015] released 27 Apr 2015 - download Operations Daily / Monthly / Weekly.xlsx - These checklists are to be used in combination with the online TechNet Lync Operations Guide. #Lync #Skype4B #Skype #ITPros Follow me for all the buzz -> @_leedesmond (Twitter)!

… and I thought I saw a 2: Lync / SfB 2013 Client Security Update – May 2015

$
0
0

As part of “Patch Tuesday” this month (which naturally occurs in Australia on a Wednesday) we have a Security Update for the Lync 2013 (aka Skype for Business) Client:

  • MS15-044 Vulnerabilities in Microsoft Font Drivers Could Allow Remote Code Execution (3057110).
  • Kb3039779 Description of the security update for Lync 2013 (Skype for Business): May 12, 2015.

What’s Fixed?

This security update provides improvements that are described in the following article:

  • Kb3064068 May 12, 2015, security update for Skype for Business (Lync 2013) changes text strings in Outlook add-in

This security update resolves non-security issues that are described in the following articles:

  • Kb3057563 Outgoing calls are disconnected in Skype for Business or Lync 2013 when you press the Spacebar or the Enter key
  • Kb3057559 Skype for Business or Lync 2013 client certificates do not begin to renew within the correct time before they expire
  • Kb3057558 User interface is misaligned in tabbed conversation that is created after an RCC user ends a call in Skype for Business
  • Kb3057556 “An error occurred during this screen presentation” error occurs in application sharing conference in Skype for Business
  • Kb3057551 Cannot paste an image into an instant message in Skype for Business when you copy the image from Internet Explorer
  • Kb3057550 Update enables users to copy instant messages without author name and time stamp in Skype for Business (Lync 2013)
  • Kb3057549 The “Allow with URL” feature does not work in a client policy for Skype for Business in a Lync Server 2013 environment
  • Kb3057548 Buttons are not displayed on sharing toolbar when you use full screen in a sharing session in Skype for Business
  • Kb3057546 Lync 2013 does not show AD DS user’s display name in the toast notification of the first incoming PSTN call
  • Kb3057545 HYPERLINK “<URL>” is displayed as a prefix of a pasted text in Notepad when you copy the text from Skype for Business
  • Kb3057518 Presence status of a contact isn’t updated in your Skype for Business after the contact disconnects from network
  • Kb3057517 Contact card appears when you click a URL that contains the “@” character in a received message in Skype for Business
  • Kb3057516 Skype contacts can see your presence status after you remove them from contact list in Skype for Business
  • Kb3054008 CPU usage increases largely when you have multiple animated emoticons in conversations in Skype for Business
  • Kb3051517 Receiver cannot open or save transferred files in a chat room in Skype for Business

What’s New?

Several things! Check out the Before / After images below for the visual comparisons

  • Like many I’ve long been annoyed that when you scrape text from an IM it always passed to the clipboard including the sender’s name and date-stamp. Now you have the option (Cog / Options / IM) to *only* capture the raw text
  • As presumably a concession to user-confusion from the re-brand, the “join” text in a Lync / Skype for Business meeting now adds “previously known as…”. (See the image).

BTW, just in case you’ve been hiding under a rock this last month, know that this update ALSO includes the Skype for Business client interface. Released last month this makes a range of changes including new sounds and program naming, as well as the optional Skype UI. All future updates to the Lync 2013 client are going to incorporate this functionality, just as each update includes all previously released fixes. I’ve covered it here.

Known Issues

From the KB: After you install this security update, you may experience the issues that are described in the following Microsoft Knowledge Base articles:

  • Kb3051158 “Help isn’t working” error occurs when you open the “Skype for Business Help” window in Skype for Business
  • Kb3051516 “Copy” and “Select All” menu items are disabled for the first instant message in a conversation in Skype for Business
  • Kb3053114 Cannot open links without the “http://” prefix and the links that are to a OneNote page in Skype for Business
  • Kb3051160 Cannot join meetings by using Lync 2010 after you install OneDrive for Business
  • Kb3053998 Memory leak occurs when you transfer a file that is larger than 5 megabytes (MB) in a conversation in Skype for Business
  • Kb3063382 Non-English localized strings are not updated in Outlook after you apply security update 3039779 for Skype for Business
  • Kb3063390 Arabic text is not right-to-left aligned in meeting invitation body when you create a Skype for Business online meeting

Pre-Req’s

Update

Download

Current Version

Released

Office 2013 (KB3039700) 1.0 4 May 2015
Office 2013 SP1 (KB2817430) 1.0 18 February 2014
LyncHelpLoc (kb2889853) 1.0 13 March 2015
LyncLoc (kb2863908) 1.0 7 March 2014


Download

This is the client fix itself:

  • x86 (lyncmso2013-kb3039779-fullfile-x86-glb.exe)
  • x64 (lyncmso2013-kb3039779-fullfile-x64-glb.exe)

Reboot?

Alas yes – but only after installing the new MSO pre-req (KB3039700).

Before / After

Before

After

SfB 15.0.4711.1002 MSO 15.0.4711.1000 SfB 15.0.4719.1000 MSO 15.0.4719.1000
SfbClientMay2015SecurityUpdate-Before SfbClientMay2015SecurityUpdate-After
SfbClientMay2015SecurityUpdate-Before-IM-edit SfbClientMay2015SecurityUpdate-After-IM-edit3
SfbClientMay2015SecurityUpdate-Before-Join-Edit2 SfbClientMay2015SecurityUpdate-After-Join-Edit2

Revision History

13th May: This is the initial post

16th May: Added images, pre-req’s & “what’s new” – with thanks to Tom Arbuthnot & Simon Gardner via Twitter for the ‘new’ content


– G.

Just a Lync Guy: Microsoft releases MS15-044: Description of the security update for Lync 2013 (Skype for Business): May 12, 2015

$
0
0

This security update resolves a vulnerability in Microsoft Lync that could allow information disclosure if a user opens a specially crafted Lync meeting request.
This security update for Microsoft Lync 2013 includes the new Skype for Business client.

Source:

Download information

Known issues

Improvements and fixes

Q&A From Microsoft:

Q1. Is the Lync UI identical to the Lync 2013 UI? Are there changes or artifacts that administrators must be aware of?

A1. People who use the Lync UI in the new client will have an experience which is very close, but not identical to the old experience. Specifically, while the traditional Lync windows and controls are unchanged, the task tray icon, the menu item in Windows, and several buttons in Outlook reflect the new Skype brand. We unfortunately do not have the ability to change the behavior of these artifacts in Windows and Outlook. There is one additional artifact which is under administrator control, which is whether the Skype for Business first run experience is displayed. This may be suppressed as described below.

Q2. Is it possible to apply the May update and suppress all Skype for Business artifacts?

A2. No. The task try icon, the menu item in Windows, and several buttons in Outlook will reflect the new Skype brand even if the Lync UI is selected. We do not have the ability to change the behavior of these artifacts in Windows and Outlook. This is because, as with any other Microsoft or 3rd party program that integrates with Windows or Office, we must conform to published standards and interfaces covering application interaction. These standards and interfaces do not provide the ability to switch behavior of the noted artifacts.

Q3. Are there any other issues to keep in mind?

A3. Yes. It is important to keep in mind the user>site>global precedence of policy settings when designing and implementing readiness steps. In some cases, setting only a “global” policy will not be sufficient. In addition, if users in an organization use Lync Basic on their personal, unmanaged computers at home, it may be necessary to communicate the changes to those users since policy settings may not apply to those personal, unmanaged computers.

Q4. Why did we add the new UI to the existing Lync 2013 client rather than waiting for the next version of Office?

A4. We added the new UI to the existing Lync 2013 client in order to make it available to customers sooner, and to ensure that current Lync 2013 customers would have the option to use the new UI now rather than later. This allows them to take advantage of the familiar UI to accelerate adoption within their organizations. As noted above, the new Skype for Business client includes both the new UI and the existing UI – this gives customers the choice of delaying adoption if better for their users and processes.


Filed under: Cumulative Update, Lync, Skype for Business Tagged: KB3039779, Lync 2013, MS15-044, Skype for Business

Lync Dude: In Place Skype for Business upgrade guide

$
0
0

Howdy,

Better late than never, I finally got me a Skype for Business Server ISO image for testing, I always wanted my Blog to have everything my readers could need, so I decided to write guide on how to upgrade from Lync to Skype for business, and because there are a number of good guides out there detailing the steps I decided to take another approach using a one diagram that describe what will you be doing in a nutshell, for details I recommend following one of the following Guides written by SkypeFB MVPs:

Before you Begin, plan ahead

Number of stuff you need to consider before starting the upgrade, first let’s talk about the possible way of upgrade, I will be talking about In-place upgrade in this article. In-Place upgrade is what we have been waiting for is finally here, allowing organizations to utilize the same hardware and upgrade to SkypeFB in a matter of minutes. The options Microsoft provided for In-Place Upgrade are:

1. Online In-Place upgrade: include no downtime for services, where you have more than one pool and you migrate users out of a pool, upgrade it, then migrate them back to it, and then upgrade the other Pool.

2. Offline In-Place upgrade: include planned downtime for the services, where you stop all Lync services, upgrade the pool, then start the services again (good for organization with only one pool).

Also you would want to make sure your infrastructure is ready to host Skype for Business Server by a number of unspoken pre-requisites that is mentioned in my diagram.

One thing important to keep in mind is the upgrade order, you should start from inside out, so start with all standby pools you have, then upgrade your Edge pool and finish up with the CMS Pool (Pool that host the CMS) that’s what Microsoft recommend

Upgrade the topology from the inside to the outside. Upgrade all your pools first, then the edge servers, and finally the Central Management Store (CMS) pool.

P.S it was mentioned that you should uninstall Lync management tools before upgrading to Skype for business nevertheless, I did not uninstall it, and used the steps I mentioned in my diagram and faced no problem related to this, so until I run into a problem because I did not uninstall the Lync management tools before upgrading, those steps are correct.

In-Place upgrading in a Nutshell

Following is a diagram I use with my clients to explain to them the In place upgrade steps that I will be doing on their Lync infrastructure.

You can download in-place-upgrade in PDF format.

hope it helps


 in-place-upgrade


The Lync Insider: Which Skype for Business Product Should You Use?

$
0
0

Skype for Business is looking like a complete ecosystem – software products covering all platforms. Desktops, laptops, phones, tablets, cloud. “Unified Communications” seems to have given way to “Universal Communications”.

Businesses have a real choice for their VoIP phones, chat, conferencing, etc. these days. If you’re going with Skype for Business, you have a decision to make – Skype for Business Server, or Skype for Business Online?

Feature Comparison

In the past, Lync Online had limits. It was missing PSTN connectivity, Enterprise Voice features & Persistent Chat.
Why Doesn’t Lync Online Include Persistent Chat? 4 Reasons
Reader Question: Call Transmission in Lync Server vs. Lync Online

That’s changing with Skype4B Online.
Skype-for-Business-logo-FI

office-365-logo2

Baked-in Enterprise Voice and PSTN Connectivity are coming with Skype for Business Online’s rollout. Which makes Skype4B Online into what many people originally thought Lync Online/Office 365 would become: a full-fledged cloud-based communications platform. UC as a Service.

Lync Online to Become Full-Fledged Hosted UC Service – NoJitter

Feature-wise, this makes the two Skype for Business platforms are very similar. Add in Exchange Online and your users may not be able to tell the difference.

Skype for Business Service Descriptions (Server and Online) – TechNet

The Differences: Support and Scale

All that said, I still think there’s even more value to Skype for Business Server 2015. You have more control over support, features unique to the Server version…and there’s the question of scalability.

Scaling up on Office 365 is pretty easy – have more users? Buy some more Business or Enterprise licenses.
(Note: Skype for Business Online is available with Office 365 Business Essentials, Premium, and Enterprise E1. But it doesn’t have PSTN capability at these levels. If you want to make calls out, you’ll need the ProPlus or Enterprise E3 levels.)

However, you’re paying more every month for users this way. You don’t with Skype for Business Server – you instead buy a one-time CAL, add users in Active Directory & enable in Skype4B.  (Thanks to Brad for the CAL reminder, below.  I’ll come back to this topic.)

Remember how I mentioned Lync Online didn’t have Persistent Chat? Turns out Skype for Business Online won’t get it either.

According to this plan comparison, Persistent Chat and dial-in audio conferencing are only available in Skype for Business Server 2015. (Enterprise Voice functionality is listed as server-only too, but the NoJitter article talks about Microsoft phasing Enterprise Voice into Skype for Business Online over time.)

I’ve said before that I’m a big fan of Persistent Chat. So this news really disappoints me. Skype for Business Online users are missing out here. Server users aren’t.

Finally, support. All Office 365 plans include phone & web/email support from Microsoft, plus the Office 365 Community. However, if you still need support beyond this, you’ll have to pay for either Premier Support or work with a Microsoft Partner.

Server 2015 support has similar options – Microsoft’s knowledge base, standard Microsoft Support, and working with a Microsoft Partner for advanced support needs.

Either way, you’d end up working with a Microsoft Partner (like us!).

Which Version to Use, by Business Size/Type

All that said, here are my recommendations for who should use which version of the Skype for Business product.

Skype for Business Server 2015:

  1. Enterprises
  2. Multi-Location businesses
  3. Cloud-Cautious businesses (security & uptime are critical, or you must keep data in-house due to regulations).
    1. A hybrid environment is also possible. We’ll discuss these options in a later post.
  4. Businesses who use (or want to use) Persistent Chat, Dial-In Audio Conferencing & E911.

Skype for Business Online:

  1. Small businesses without an Exchange Server
  2. New businesses/startups (until the company grows)
  3. Organizations using a group of online communications tools already – WebEx, Join.Me, Jabber/Google Talk, HipChat

(I reserve the right to modify these recommendations later, as we see more of the rollout!)

While cloud-based services definitely have value – we host our own private cloud for customers, in fact – there’s still plenty of case to use an on-prem version.

Which Skype for Business product are you considering? Please comment or email with your thoughts and reasoning.

The post Which Skype for Business Product Should You Use? appeared first on The Lync Insider.

Lee Desmond: RTM! Debugging Tools Skype for Business Server 2015

$
0
0
Skype for Business Server 2015, Debugging Tools - version 9319.20 released 12 May 2015 - this is a collection of additional tools for use by IT Admins - aids troubleshooting Skype for Business Server 2015 deployments - tools included: Snooper, CLSLogger and CLSScenarioEdit.psm1 - works with Skype for Business Server 2015 running on Windows Server 2008 R2 SP1 and Windows Server [...]

Matt Landis: Skype for Business User QuickTip #37: Did You Know You Can Change Where Notification Toasts (Alerts) Display?

$
0
0

Did you ever wish you could change where on a monitor and on which monitor conversation toasts (alerts) displayed? With Skype for Business client you now can.

image

In the Skype for Business client just click on Options | Alerts and change “Where should alerts appear?”

image

See the other Skype for Business User QuickTips (formerly known as Lync)
http://windowspbx.blogspot.com/search/label/LyncUserTip

Matt Landis: Skype for Business User QuickTip #38: Login to Skype4B More Than Once on the Same PC

$
0
0

The Skype for Business Web SDK brings a whole new realm of possibilities to Skype for Business and this is likely the least exciting, but…for those who have been asking for it: You now have a way to run Skype4B multiple times on the same machine!

The Skype Web SDK has a “Samples Preview” which is a barbarically simple Skype4B client, which, from my simple tests allows you to open multiple browser windows and login in as separate users.

image

How to get the Skype Web SDK:
https://msdn.microsoft.com/en-us/library/dn962133(v=office.16).aspx

See the other Skype for Business User QuickTips (formerly known as Lync)
http://windowspbx.blogspot.com/search/label/LyncUserTip

Lync 2013: MS Ignite is done and back to normal days again

$
0
0
MS Ignite in Chicago was great. Lots of great speakers and lots of News.
On one of the sessions they showed of the Skype for business Broadcast function that comes in Skype for business Online.
From this feature you can have "Meeting" With upto 10000 People and also record it so that it can be downloaded later.
When using the broadcast function, all sound and what you show off is 20 secunds delayed. And it will play off in Your webbrowser.

One other Nice feature they showed, and where I learned something New was if you are in Lync or Skype for Business Meeting, then you can present PowerPoint directly from the PowerPoint Application.
Matt Landis has blogged about it here:
http://windowspbx.blogspot.no/2015/05/skype-for-business-user-quicktip-35.html?utm_source=feedburner&utm_medium=feed&utm_campaign=Feed:+MattLandisWindowsPbxUcReport+(Matt+Landis+Windows+PBX+%26amp;+UC+Report)


Lyncd Up: May Lync / Skype For Business Client Update bring Security Fix and New Features

$
0
0

The May Skype for Business client update is out:

image


Downloads:


image


It brings an important security fix, MS15-044, and also a lot of other fixes and features.

Note, this patch also includes the previously released Lync 2013/Skype for Business UI changes, be sure you understand them.

My favourite new feature, we can finally disable the annoying (IMHO) name and date insertion when you copy past from chat:

image


image

Copy past before:

[?14/?05/?2015 19:17] Tom Arbuthnot:

www.test.com

Copy Paste with “copy message only”

www.test.com


There is also now some text that explains “Skype Meeting” in invites (hat tip to Simon Gardner):

image


Improvements and fixes

This security update provides improvements that are described in the following article:

This security update resolves nonsecurity issues that are described in the following articles:


Known issues

After you install this security update, you may experience the issues that are described in the following Microsoft Knowledge Base articles:

From Tom Talks UC at http://tomtalks.uk
     

Quick RegEx Trick

$
0
0

AnientRegExI thought I blogged this but I guess I didn’t. So I am posting this mostly to save myself time finding this the next time I look for it.

I had a regular expression that returned 2 variables. Here is what I wanted:

$1555$2.

However Lync interprets “$1555″ as a variable instead of what I want which is just $1 as the variable. So how do I tell regular expression that it should stop at the first 1 and not continue until the next delimiter ($2)?

Answer:

Use curly braces

Re-writing it in this format got me the desired result:

${1}555$2

The fourth paragraph on this website is what got me the answer – http://www.regular-expressions.info/replacebackref.html

Just a Lync Guy: Deploying Call Quality Dashboard (CQD) for Skype for Business Server 2015

$
0
0

One of the new features introduce for Skype for Business Server 2015 is the Call Quality Dashboard (CQD):

The Skype for Business Server 2015 Call Quality Dashboard (CQD) is a reporting layer on top of the Quality of Experience Database in the Monitoring Server in Skype for Business Server 2015 and Lync Server 2013. CQD uses Microsoft SQL Server Analysis Services to provide aggregate usage and call quality information as well as filtering and pivoting on the data set.

Components:

The Call Quality Dashboard consists of several databases, Microsoft SQL Agent jobs, processes, and web applications. The Microsoft SQL Agent jobs periodically copy data from the QoE Metrics database into the QoE Archive database and processes the Cube with the data in the QoE Archive database. The Repository database stores the report definitions that power the Portal. The Portal provides browser access to the Cube data.

The CQD components, including the QoE Archive, Cube, and Repository databases, can be installed on the Monitoring Server, installed on its own server, or installed across multiple servers. The particular installation method depends on the performance demands of CQD as well as impact to other processes on the same servers.

CQD Components

Prerequisites:

Call Quality Dashboard (QCD) consists of three major components:

  • Archive Database, where the Quality of Experience (QoE) data is replicated and stored.
  • Cube, where data from QoE Archive database is aggregated for optimized and fast access.
  • Portal, where users can easily query and visualize QoE data.

CQD utilizes Microsoft SQL Server, Microsoft SQL Analysis Server, and Microsoft Internet Information Server so CQD’s minimum hardware and software requirements are basically the same as those dependent components. However, based on the organization’s requirements around data freshness (which will depend in part on the volume of QoE data the organization generates) and deployment cost, additional deployment considerations should be made.

The following versions of SQL Server are supported:

  • SQL Server 2008 R2
  • SQL Server 2012
  • SQL Server 2014

Please note that both for the Cube and analysis services required SQL Enterprise Edition is recommended but not requited.

Business Intelligence or Enterprise edition is recommended for performance reasons. These editions allow use of multiple partition files that can be processed in parallel, which is beneficial for processing data spanning multiple months or longer.

While not recommended, Standard edition is supported as well. Processing will be constrained to a single partition (which needs to be configured during setup).

You can follow those guidelines in order to upgrade SQL STD to SQL ENT.

Deployment Steps:

the following steps are taken from the Microsoft TechNet: Deploy Call Quality Dashboard for Skype for Business Server 2015

1. Download and copy the CallQualityDashboard.msi to the machine where the archive database component of CQD is to be installed (this is the machine that has SQL Server installed).

image

2. Execute the MSI (Windows will prompt to run with administrator privilege, do so).

imageimage

3. Accept the EULA.

image

4. Select the destination folder where files related to Call Quality Dashboard components will be located or accept the default location.

image

5. Select all features.

image

6. At the QoE Archive Configuration page, provide the following information:

  • QoE Metrics SQL Server: SQL Server instance name for where the QoE Metrics DB is located (this will be the data source).
  • QoE Archive SQL Server Name: This is read-only field and fixed to the fully qualified domain name of the local machine. Archive DB can be installed only on the local machine.
  • QoE Archive SQL Server Instance: A local SQL Server instance name for where the Archive DB is to be created. To use a default SQL Server instance, leave this field blank. To use a named SQL Server instance, specify the instance name (e.g. the name after the “\”).
  • QoE Archive Database: By default, this option is set to “Create new database”. Since Archive DB upgrade is not supported, the only circumstance under which the “Use existing database” option can be used is if the existing Archive database has the same schema as the build to be installed.
  • Database File Directory: Path to where the database files (.mdf and .ldf) for the Archive DB should be placed. This should be on a drive (HDD2 in the recommended hardware configuration) separate from the OS. Note that since the file names are fixed in the install, to avoid any potential conflict, it is recommended that a blank directory with no files be used.
  • Use Multiple Partitions: The default is set to “Multiple partition”, which requires Business Intelligence edition or Enterprise edition of SQL Server. For Standard edition, select “Single Partition” option. Note that cube processing performance may be impacted if Single Partition is used.
  • Partition File Directory: Path to where the partitions for the QoE Archive database should be placed. This should be on a drive (HDD3 in the recommended hardware configuration) separate from the OS drive and SQL database log files drive. Note that since the file names are fixed in the install, to avoid any potential conflict, it is recommended that a blank directory with no files be used.
  • SQL Agent Job User – User Name & Password: Domain service account name and password (masked) that will be used to run the “QoE Archive Data” step of the SQL Server Agent job (which will run the stored procedure to fetch data from QoE Metrics DB into Archive DB, so this account must have read access to QoE Metrics DB, as indicated under Accounts section. This account also needs to have a login in the QoE Archive SQL Server Instance).
    Please use DOMAIN\USERNAME convention as UPN is not supported.

imageimage

If you don’t have SQL Enterprise edition and you choose Multiple Partition, the following error message will appear:

image

You can choose Single Partition to install it on STD edition:

image

7. Upon clicking next, the installer will perform pre-requisite checks and report if any issues are encountered. When all pre-requisite checks pass, the installer will go to the Cube Configuration page.

8. At Cube Configuration page, provide the following information:

  • QoE Archive SQL Server Name: This is read-only field and fixed to the fully qualified domain name of the local machine. Cube can be installed only from the machine that has QoE Archive database (Note. Cube itself may be installed on a remote machine. See below)
  • QoE Archive SQL Server Instance: SQL Server instance name for where the QoE Archive DB is located. To specify a default SQL Server instance, leave this field blank. To specify a named SQL Server instance, enter the instance name (e.g. the name after the “\”). If QoE Archive component was selected for the install, this field will be pre-populated with the value provided on the QoE Archive Configuration page.
  • Cube Analysis Server: SQL Server Analysis Service instance name for where the cube is to be created. This can be a different machine but the installing user has to be a member of Server administrators of the target SQL Server Analysis Service instance.
  • Use Multiple Partitions: The default is set to “Multiple partition”, which requires Business Intelligence edition or Enterprise edition of SQL Server. For Standard edition, select “Single Partition” option. Note that cube processing performance may be impacted if Single Partition is used.
  • Cube User – User Name & Password: Domain service account name and password (masked) that will trigger the cube processing. If QoE Archive component was selected for the install, this field will be pre-populated with the value provided on the Archive Configuration page for the SQL Agent Job User, but we recommend specifying a different domain service account so that Setup can grant the least required privilege to it.

image

9. When clicking next, another round of validation will be performed and any issue will be reported. Upon successful completion of the validation, the installer will go to the Portal Configuration page.

10. At Portal Configuration page, provide the following information:

  • QoE Archive SQL Server: SQL Server instance name for where the QoE Archive database is located. Note that unlike the QoE Archive Configuration page and the Cube Configuration page, the machine name is not fixed and must be provided. If QoE Archive component was selected for the install, this field will be pre-populated with the value provided on the QoE Archive Configuration page.
  • Cube Analysis Server: SQL Server Analysis Service instance name for where the cube is located. If Cube component was selected for the install, this field will be pre-populated with the value provided on the Cube Configuration page.
  • Repository SQL Server: SQL Server instance name where the Repository database is to be created. If the SQL Server instance name for where the QoE Archive database is located has been provided earlier in the setup (in other components), this field will be pre-populated with the QoE Archive DB SQL Server instance name. This can be any SQL Server instance.
  • Repository Database: By default the option is set to “Create new database”. Since Repository DB upgrade is not supported, the only circumstance under which the “Use existing database” option can be used is if the existing Repository DB has the same schema as the build to be installed.
  • IIS App Pool User – User Name & Password: The account that the IIS application pool should execute under. The User Name and Password fields will be grayed out if built-in system accounts are selected. These fields will only be enabled if “Other” is selected from the drop down box so the user can enter the domain service account information.

imageimage

11. When clicking next, the final round of validation will be done to ensure that the SQL Server instances are accessible using the credentials provided and that IIS is available on the machine. Upon successful completion of the validation, the installer will proceed with the setup.

image

12. When the installer is done, most likely the SQL Server Agent job will be in progress, doing the initial load of the QoE data and the cube processing. Depending on the amount of data in QoE, the portal will not have data available for viewing yet.

13. The main portal page is accessible via http://<machinename>/CQD

image

image

image

Known Issues and notes from the deployment in my Lab environment:

  • If you decided to install the CQD on the same server that host the existing Skype for Business SQL Reporting service, be aware the the Default Web Site is already reserved for the reporting service and therefore you’ll need to change default Web site binding port.
  • If you decide to go forward with Multiple partition, make sure the SQL instance is configured as ENTERPRISE edition and has the Analysis service running
  • If you have SQL Server 2008 R2 STD, make sure you upgrade it to SP2
  • Make sure the SQL Agent Service for the instance is running
  • Restart the SQL services / server before installing the CQD or after upgrading to ENT, otherwise the CUBE won’t allowed to continue in setup
  • QoE data and the cube processing may take some time for initially load the data using the existing stored procedure.
  • Some advanced configuration are required for setting authorization and access rules, those are detailed explained in the following URL: https://technet.microsoft.com/en-us/library/mt126252.aspx
  • After users are authenticated by IIS, they will have to have file permissions on the CQD directory in order to access the web portal content. It is possible to change the ACLs through the security tab of the CQD directory properties to add individual users or groups; however the recommended approach is to leave the file permissions untouched. Instead, change the IIS setting to use the IIS worker process to access the CQD directory no matter which user is authenticated.

image

image

  • In rare cases, the installer fails to create the correct settings in IIS. Manual change is required to allow users to log into the CQD and change the default authentication configurations and enable Extended Protection on the Windows Authentication Advanced tab:

Deploy Call Quality Dashboard

image

those steps needs to be repeated for each of the “CQD”, “QoEDataService”, and “QoERepositoryService” entries below “Default Web Site”.

Additional Sources:

Download: Skype for Business Server 2015, Call Quality Dashboard Call Quality Dashboard for Skype for Business Server 2015 Deploy Call Quality Dashboard for Skype for Business Server 2015 Plan for Call Quality Dashboard for Skype for Business Server 2015
Filed under: Lync, Skype for Business Tagged: Archive, Call Quality Dashboard, CQD, Lync Server 2013, Reporting, Skype for Business Server 2015

Mastering Lync: Using Call Quality Dashboard (Part One)

$
0
0

This is going to be a multi-part series on using the Call Quality Dashboard.  I don’t have a sense of how many articles there will be but I promise more than one and less then 100.

Overview

The Call Quality Dashboard allows you as an administrator to look your QoE/CDR information in a different tool.  The interesting thing about the CQD is the ability to modify and create your own reports.  The goal of this series of posts is to see how many and the types of reports I can create within the free CQD system.

Monthly Summary Report

The first report I am going to create is a monthly stream report.  This report is going to show me a single bar graph for each month that display the audio, video and app sharing streams in my organization.

  1. Go to the Call Quality Dashboard
  2. Fine the Audio Streams Monthly Trend report on the home page and click Clone.  This will create a new report to the right of all existing reports.  Click on edit.
  3. There are three sections you can edit within the report.The first is the dimension, measurements and filters (red box).  For this first graph we are creating you can leave dimensions and filters.  Under measurements, remove all of the existing measurements and add the following: Audio Streams Count, Video Streams Count and App Sharing Streams Count.

    In the top section (blue box), you want to make sure that Chart and Trend are both selected.

    In the bottom section (green box) you should click edit and modify the report name and description.  Name: Monthly Streams Report.  Description: This report shows audio, video and app sharing stream counts by Month.

    The final report configuration should look like the above.

Your final report should look like the following.  The report will show all audio, video and app sharing streams in a single bar graph over a monthly trend.

Daily Summary Report

In our second report, we are going to dive into our monthly summary report we created above and add a last 30 days summary report.

  1. Since we want this report to be a sub report of the monthly summary report, click the Add Sub Report button

    This will copy the Monthly Summary Report and add it as a sub report.

  2. Click Edit.  Change the Dimension from StartDate.Month to StartDate.Date.  Edit the title and description of the report.

Your final report should look like the following.  The report will show all audio, video and app sharing streams in a single bar graph daily over a month.

That is the start of our report package created with CQD.  As more are created I’ll update this post.


Dr. Lync: Setup step 2 fails on skype for business enterprise edition frontend server

$
0
0
Hi,
Recently had an issue with installing Skype for business enterprice edition on a new server.
I gor the error: "Prerequisite not satisfied:" and then it refers to a link.
When you try to open the url you get "404 -not found"
I had all the newest windows updates installed on this server. Windows 2012 R2 server.
The answer is marked in yellow.
A prerequisite is missing.
You will find the update here: https://support.microsoft.com/en-us/kb/2982006
Install it and then you are able to run step 2 in deployment wizard.

Just a Lync Guy: Script: Exchange Online Audit Log Reports (HTML Format)

$
0
0

One of my favorite scripts is Mike Pfeiffer Administrator Audit Log Reports in HTML Format script which allows you go get a daily HTML report via email of all the changes that we made on your on-premises environment.

This is actually a great way to monitor you environment, not specifically to blame someone if he something went wrong, but in case there are issues or human error, it allow you to look back in the history and see what changes were made any by who.

Office 365 Challenge

I was wondering to myself, how complicated would it be to use the same script , but make it work on Office 365 Exchange Online environment so we can get the same level of reporting and auditing changes, but on Exchange Online.

I’ve asked Mike for permission to take his script and together with Yoav Barzilay we modified it a bit, and we proudly presenting you with Get-ExchangeOnlineAuditReport, the same functionally but for Office 365 Environment Smile

image

We’ve included the Exchange Online connectivity in the tool and also had some additional options such as including Proxy if you have any and also be able to load credentials directly from the credential manager instead of putting it hardcoded in the script exposes to all.

Download:

TechNet Gallery | OneDrive

Prerequisites:

1. Creating a Generic Credential under the Credential Manager > Windows Credentials. The name appears in the “Internet or network address” is the name of the parameter of $TenantCredentialKey

image

image

2. Having an internal/external SMTP server that can relay your email messages, in case you don’t provide email parameters there will be a daily HTML file being put under the %TEMP% folder so you can access it manually.

Usage:

1. Creating an HTML file with the report under the %temp% folder

 .\Get-ExchangeOnlineAuditReport.ps1 –TenantCredentialKey <CREDENTIALKEY NAME>

2. Sending the Report VIA email (can be used in a scheduled task as well):

 .\Get-ExchangeOnlineAuditReport.ps1 –TenantCredentialKey <CREDENTIALKEY NAME> -to
to@smtp.domain -from from@smtpd.domain –smtpserver <INTERNAL SMTP SERVER>

3. Sending the Report VIA email (can be used in a scheduled task as well) while having Proxy enabled on the server:

 .\Get-ExchangeOnlineAuditReport.ps1 –TenantCredentialKey <CREDENTIALKEY NAME> -to
to@smtp.domain -from from@smtpd.domain –smtpserver <INTERNAL SMTP SERVER> –ExchangeOnlineWithProxy

Task Scheduler:

Just create a simple task with the following lines as the commands and make sure you run it with highest privileges:

image

1. Creating a daily HTML report in the %TEMP% Folder:

Powershell.exe -command “& ‘C:\Scripts\Get-ExchangeOnlineAuditReport.ps1′ -TenantCredentialKey ””

2. Creating a daily HTML report being sent via email:

Powershell.exe -command “& ‘C:\Scripts\Get-ExchangeOnlineAuditReport.ps1′ -TenantCredentialKey ” -To <to@smtp.domain> -From <from@smtp.domain> -SmtpServer “

3. Creating a daily HTML report being sent via email when Proxy is configured:

Powershell.exe -command “& ‘C:\Scripts\Get-ExchangeOnlineAuditReport.ps1′ -TenantCredentialKey ” -To <to@smtp.domain> -From <from@smtp.domain> -SmtpServer -ExchangeOnlineWithProxy”


Filed under: Exchange, Script Tagged: Audit Log Report, Exchange Online Audit Log Reports, HTML, Mike Preiffer, O365

Matt Landis: Installing Skype for Business Server 2015 Standard Edition Front End on Windows Server 2012R2 Step by Step

$
0
0


Below are the step by step instructions to install Skype for Business Server 2015 Standard Edition Front End on Windows Server 2012R2. Here is an outline of what we will do:

  1. Prepare Servers
  2. Install Skype for Business Server 2015 Admin Tools
  3. Prepare Active Directory
  4. Admin rights, Add AD Users, Configure DNS
  5. Prepare First Server
  6. Define Topology
  7. Install Skype for Business Server 2015
  8. Enable AD Users & Login to Skype for Business client

Prepare Environment

Some prerequisites for you Skype for Business system:

  • You will need 1 AD Server O/S and 1 Skype for Business Server O/S
    • Skype for Business Server  requires 64bit O/S
  • This guide is Using Windows Server 2012R2 64bit
    • You will need to have the OS update to date to install KB2982006, so now is the time get your up to date.
  • Make Sure you have the below role running on your AD Server
    • AD-DS (Directory Services)
    • DNS
    • AD-CS (Certificate Authority

Prerequisites for your Front End Server

skype4b server prerequisites

or Install using Powershell:

Add-WindowsFeature NET-Framework-Core, RSAT-ADDS, Windows-Identity-Foundation, Web-Server, Web-Static-Content, Web-Default-Doc, Web-Http-Errors, Web-Dir-Browsing, Web-Asp-Net, Web-Net-Ext, Web-ISAPI-Ext, Web-ISAPI-Filter, Web-Http-Logging, Web-Log-Libraries, Web-Request-Monitor, Web-Http-Tracing, Web-Basic-Auth, Web-Windows-Auth, Web-Client-Auth, Web-Filtering, Web-Stat-Compression, Web-Dyn-Compression, NET-WCF-HTTP-Activation45, Web-Asp-Net45, Web-Mgmt-Tools, Web-Scripting-Tools, Web-Mgmt-Compat, Server-Media-Foundation, BITS

Add below if no access to the web add “-source d:\sources\sxs” to the end of the above powershell. (if the Server 2012R2 CD is in the D:\ drive)

image

Now reboot.

Install Skype for Business Server 2015 Admin Tools

Insert CD and Run Setup.exe. (you may see installing c+ flash by) You can accept default location and click Install (below)

image

Accept license and OK

image

When install is complete (minute wait time) you will have the Skype for Business admin tools on your server and the Skype for Business Server Deployment Wizard (below) will appear.

image

Let’s just make sure the admin tools are showing on the start menu | More apps. Sure enough, they are there. (now is a great time to pin them both to start & taskbar)

image

Now lets install the Topology Builder & Control Panel as well. click “Install Administrative Tools”

image

Let’s verify: Yup, sure enough they are there.

image


Prepare Active Directory

Click “Prepare Active Directory”. (As noted in prerequisites, you will need AD DS and AD LDS Tools Feature installed on your Front End to complete this step.)

image

  • Step 1: Prepare Schema. (takes 1minute, and you may need to wait a couple minutes before this and step 2) 
  • Step 2: Verify Replication of Schema is not necessary if this is a Lab and there is only one AD server—you can safely keep moving to step 3.
  • Step 3: Prepare Forest | Next | select Local Domain  | Next (5sec)
  • Step 4: Verify by running opening  Skype for Business Server Management Shell (remember, we pinned it to the taskbar for a reason!)  and run “Get-CsAdForest”. If it returns “LC_FORESTSETTINGS_STATE_READY” we rock.
  • Step 5: Prepare Domain | Next (5sec)
  • Step 6: just keep moving
    • or verify by opening “Active Directory Users & Computers” and see if “csAdministrator” is in the Users container.
  • Step 7 below

image

Add Skype for Business Administrator User To Admin Group

Add the Administrator to CSAdministrator  group (below) 

image

Create Some Users

While we are in AD, we will create 3 test users named: u1@landislab.local, u2@landislab.local, and u3@landislab.local. Just add them as normal AD users.

Create the Share

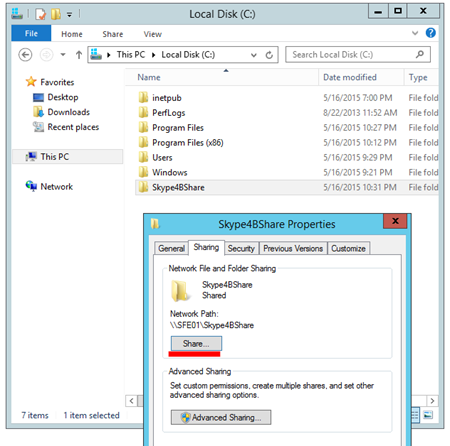
We will create a folder c:\Skype4BShare then add the local Administrators group on the server hosting the file share, grant Allow: Full Control, Change, and Read rights, and then click Share.

image

Prepare First Standard Edition Server

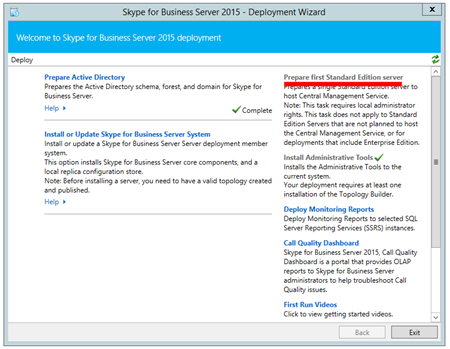
Now lets go back to the Deployment Wizard and click “Prepare first Standard Edition server”.

image

You will see the below “Prepare single Standard Edition Server” wizard window and you can just click “Next”. During this process the below will be installed:

  • SQL Server 2014 Express Edition will be installed
  • RTC databases will be created and populated
  • Firewall Rules will be created
  • Skype for Business Server installation files will be put in place , etc.


Create DNS Records

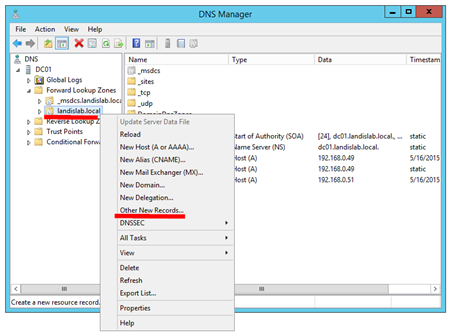
Lets open DNS Manager on AD server. Right click on your domain (in our case landislab.local) under Forward Lookup Zones, click “Other New Records…” and scroll down to “Service Location (SRV)” and click Create Record.

image

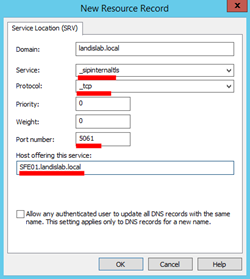
Will will add a DNS SRV record pointing at our Skype for Business FE Server FQDN (SFE01.landislab.local in our case)

  • Service = _sipinternaltls
  • Protocol = _tcp
  • Port number = 5061
  • Host Offering the service =  fqdn of Skype for Business Std. FE server or Pool. (In our case SFE01.landislab.local )

image

Note: a DNS A record should already be pointing to the Front End Server (SFE01.landislab.local)

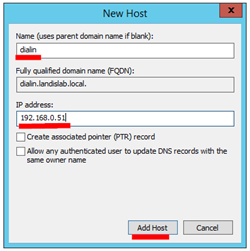
We will also create several DNS A Records. Right click, “New Host (A or AAAA)…” Add a DNS A record for

  • meet
  • dialin
  • admin
  • scheduler
  • lyncdiscoverinternal
  • webint

as shown below

image

Repeat this for the rest of the DNS A Records.

Define Topology

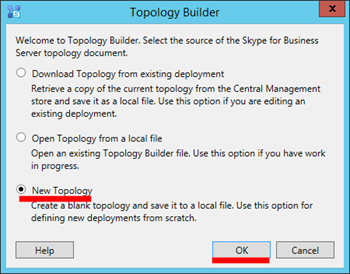
Now we will open the Topology Builder.  Select New Topology (as shown below) and then give the topology some name (just any old name like “mylab.tbxml”)

image

Now we will be define this topology.

Primary SIP domain: landislab.local | Next

image

Specify additional supported domains: {nothing to enter/change} | Next

Define first site:  Name=SomeSiteName {Site1}; Description=just something | Next

Specify site details: Enter City, State/Province, Country/Region Code | Next

“New Topology was successfully defined” & we will click Finish to start New Front End Wizard.

image

Next we will define a new Front End pool. click Next

image

Define Front End Pool

  • FQDN: SFE01.landislab.local 
    • Note: if this is a Standard Edition, this FQDN will be exactly the same FQDN as your FE server  (SFE01.lab.local in our case)
  • Select “Standard Edition Server”

image

Next we will select Features for this Front End Pool

Check these features:

  • Conferencing
  • Enterprise Voice
  • CAC

TIP: What works best for me is to NOT define ARCHIIVE and MONITOR servers till you are ready to actually install them. I suggest to NOT select Archiving and Monitoring now. We will do that after we have actually installed the SQL server and are ready to define those roles in topology builder.

image

Select Collocated server roles

  • collocate Mediation Server: check
image

Associate server roles with this front End pool. (screen not shown) Enable an Edge pool…: UNchecked (we will set this up later)

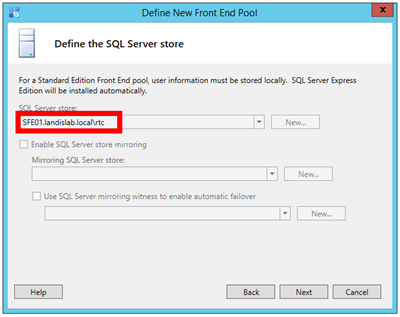
Define the SQL Server store. SQL Server store: SFE01.landislab.local\rtc (if we did everything correctly this should be in the field

image

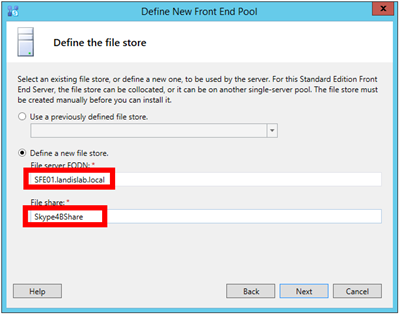
Define the file store: Remember the Skype4BShare we setup before? Now we will use it. Under “File share” enter Skype4BShare

image

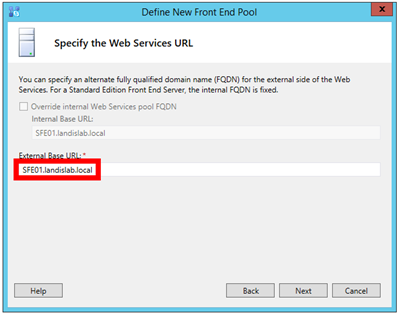
Specify the Web Services URL: Since this is a lab we can let the External Base URL the default.

image

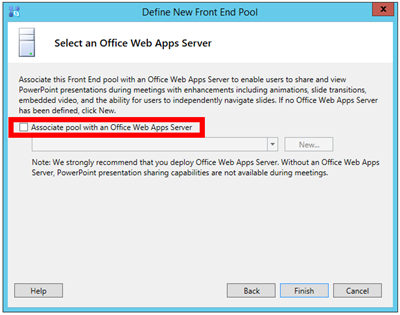
Select an Office Web Apps Server: (you probably don’t have one yet, so UNcheck “Associated pool with an Office Web Apps Server)

image

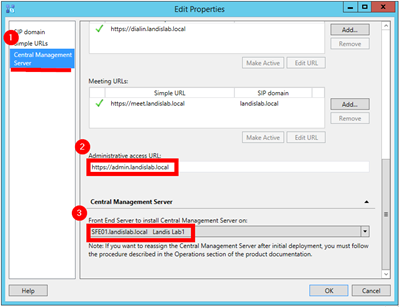
When you click “Finish” you are finished with the wizard, and will be shown the Skype for Business Server 2015 Topology Builder main screen. We need to edit the Topology so select “Skype for Business Server” & click Action | Edit Properties

image

Scroll down to “Administrative access URL” (as shown below) and define the admin url as https://admin.landislab.local and select Front End Server (SFE01.landislab.local in our lab)

image

Publish Topology

In the Topology Builder click: Action | Publish | Next | (Select CMS) Next

image

When finished you can “Click Here to open to-do list”. Since we are really good we’ve already done these items. (if you took a shortcut, backup to see detailed step above)

image

Install Skype for Business Server System

image

Open “Skype for Business Server 2015 - Deployment Wizard” | Install or Update Skype for Business Server System

image

Now we will install some Skype for Business Server System components, put Certs in place and Start Services:

  1. Step1 Install RtcLocal database
  2. Step2 Install Speechfiles, etc.
  3. Setup Certs
  4. Start [Skype for Business] Services

image

  • Step1 Install Local Configuration Store (will install RtcLocal)
    • Run
    • Retrieve Directly from the CMS…
    • Next (5-8 minutes on new lab system)
  • Step2 Setup Skype for Business Server Components (will install Speechfiles, etc)
    • Run |
    • Next (15 minutes on new lab systems)
    • Some things that can cause this step to fail
      • You didn’t install KB2982006 as we strenuously noted above :)
      • You designated the archive/monitoring server, this will fail if the SQL for those stores is not there yet.
  • Step3 Request Certs
    • Note: if this is a lab setup, and you have parallel installed AD and Lync FE OS’s, remember the FE needs to have “gpudate /force” run or be rebooted after you stand up the AD CA so the CA is authoritative

Run, Now select “Default Certificate” then click “Request”

image

Certificate Request:  Next

image

Certificate Request Summary: Next

image

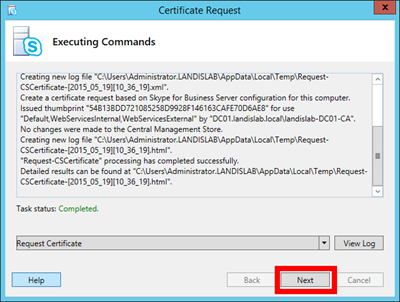
Executing Commands: Next

image

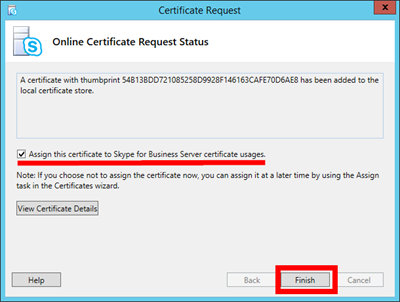
Online Certificate Request Status: Finish

image

Certificate Assignment: Next

image

Certificate Assignment Summary: Next

image

Executing Commands… Finish

image

The certificates have been successfully requested and assigned.

image

Now repeat Step 3 for OAuthTokenIssuer.

Step 4: Start Services

Using the Skype for Business Server Management Shell

run Start-CsPool –PoolFQDN SFE01.landislab.local

image

NOTE: If you lab is using minimal RAM, this could take several minutes. (4GB = 8minutes)

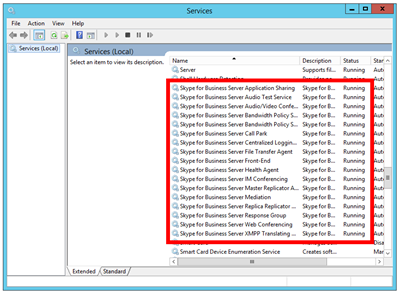
We can open to see if all the Skype for Business services are running and…sure enough!

image

Now let’s open the Skype for Business Server Control Panel
image

You may be prompted to enter your Administrator credentials. (how to avoid this in the future: click here)

image

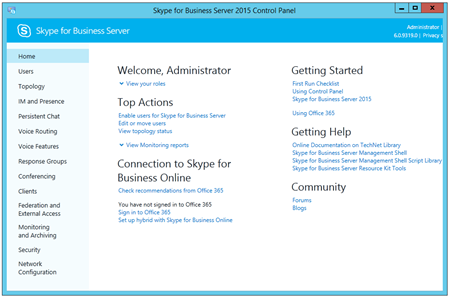
Now we get our first look of the Skype for Business Server 2015 Control Panel.

image

Enable AD Users

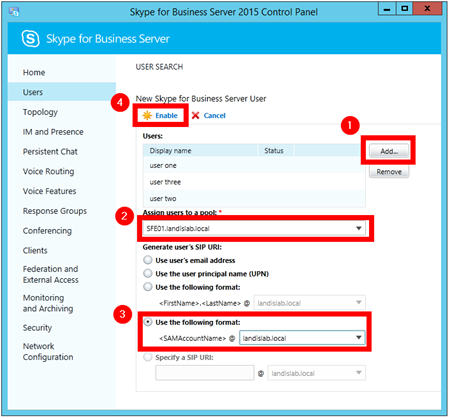
Now back to the Front End server and the Skype for Business Server 2015 Control Panel. Click on Users | Enable Users. Now click the “Add” button and Add the 3 users. (those 3 users we created earlier)

image

Click “Enable” and if you get no errors, you should have 3 Skype for Business users ready to login. Let’s open Skype for Business and login!

image

You have successfully installed Skype for Business Server 2015. Congratulations!

Read the Entire “Skype for Business Server 2015 Step by Step” Series
Installing Skype for Business Server 2015 Standard Edition Front End
Lync Server 2013 to Skype for Business Server 2015 In Place Upgrade

or, Get the Free eBook: Click Here

Just a Lync Guy: Deploying Call Quality Dashboard (CQD) for Skype for Business Server 2015

$
0
0

One of the new features introduce for Skype for Business Server 2015 is the Call Quality Dashboard (CQD):

The Skype for Business Server 2015 Call Quality Dashboard (CQD) is a reporting layer on top of the Quality of Experience Database in the Monitoring Server in Skype for Business Server 2015 and Lync Server 2013. CQD uses Microsoft SQL Server Analysis Services to provide aggregate usage and call quality information as well as filtering and pivoting on the data set.

Components:

The Call Quality Dashboard consists of several databases, Microsoft SQL Agent jobs, processes, and web applications. The Microsoft SQL Agent jobs periodically copy data from the QoE Metrics database into the QoE Archive database and processes the Cube with the data in the QoE Archive database. The Repository database stores the report definitions that power the Portal. The Portal provides browser access to the Cube data.

The CQD components, including the QoE Archive, Cube, and Repository databases, can be installed on the Monitoring Server, installed on its own server, or installed across multiple servers. The particular installation method depends on the performance demands of CQD as well as impact to other processes on the same servers.

CQD Components

Prerequisites:

Call Quality Dashboard (QCD) consists of three major components:

  • Archive Database, where the Quality of Experience (QoE) data is replicated and stored.
  • Cube, where data from QoE Archive database is aggregated for optimized and fast access.
  • Portal, where users can easily query and visualize QoE data.

CQD utilizes Microsoft SQL Server, Microsoft SQL Analysis Server, and Microsoft Internet Information Server so CQD’s minimum hardware and software requirements are basically the same as those dependent components. However, based on the organization’s requirements around data freshness (which will depend in part on the volume of QoE data the organization generates) and deployment cost, additional deployment considerations should be made.

The following versions of SQL Server are supported:

  • SQL Server 2008 R2
  • SQL Server 2012
  • SQL Server 2014

Please note that both for the Cube and analysis services required SQL Enterprise Edition is recommended but not requited.

Business Intelligence or Enterprise edition is recommended for performance reasons. These editions allow use of multiple partition files that can be processed in parallel, which is beneficial for processing data spanning multiple months or longer.

While not recommended, Standard edition is supported as well. Processing will be constrained to a single partition (which needs to be configured during setup).

You can follow those guidelines in order to upgrade SQL STD to SQL ENT.

Deployment Steps:

the following steps are taken from the Microsoft TechNet: Deploy Call Quality Dashboard for Skype for Business Server 2015

1. Download and copy the CallQualityDashboard.msi to the machine where the archive database component of CQD is to be installed (this is the machine that has SQL Server installed).

image

2. Execute the MSI (Windows will prompt to run with administrator privilege, do so).

imageimage

3. Accept the EULA.

image

4. Select the destination folder where files related to Call Quality Dashboard components will be located or accept the default location.

image

5. Select all features.

image

6. At the QoE Archive Configuration page, provide the following information:

  • QoE Metrics SQL Server: SQL Server instance name for where the QoE Metrics DB is located (this will be the data source).
  • QoE Archive SQL Server Name: This is read-only field and fixed to the fully qualified domain name of the local machine. Archive DB can be installed only on the local machine.
  • QoE Archive SQL Server Instance: A local SQL Server instance name for where the Archive DB is to be created. To use a default SQL Server instance, leave this field blank. To use a named SQL Server instance, specify the instance name (e.g. the name after the “\”).
  • QoE Archive Database: By default, this option is set to “Create new database”. Since Archive DB upgrade is not supported, the only circumstance under which the “Use existing database” option can be used is if the existing Archive database has the same schema as the build to be installed.
  • Database File Directory: Path to where the database files (.mdf and .ldf) for the Archive DB should be placed. This should be on a drive (HDD2 in the recommended hardware configuration) separate from the OS. Note that since the file names are fixed in the install, to avoid any potential conflict, it is recommended that a blank directory with no files be used.
  • Use Multiple Partitions: The default is set to “Multiple partition”, which requires Business Intelligence edition or Enterprise edition of SQL Server. For Standard edition, select “Single Partition” option. Note that cube processing performance may be impacted if Single Partition is used.
  • Partition File Directory: Path to where the partitions for the QoE Archive database should be placed. This should be on a drive (HDD3 in the recommended hardware configuration) separate from the OS drive and SQL database log files drive. Note that since the file names are fixed in the install, to avoid any potential conflict, it is recommended that a blank directory with no files be used.
  • SQL Agent Job User – User Name & Password: Domain service account name and password (masked) that will be used to run the “QoE Archive Data” step of the SQL Server Agent job (which will run the stored procedure to fetch data from QoE Metrics DB into Archive DB, so this account must have read access to QoE Metrics DB, as indicated under Accounts section. This account also needs to have a login in the QoE Archive SQL Server Instance).
    Please use DOMAIN\USERNAME convention as UPN is not supported.

imageimage

If you don’t have SQL Enterprise edition and you choose Multiple Partition, the following error message will appear:

image

You can choose Single Partition to install it on STD edition:

image

7. Upon clicking next, the installer will perform pre-requisite checks and report if any issues are encountered. When all pre-requisite checks pass, the installer will go to the Cube Configuration page.

8. At Cube Configuration page, provide the following information:

  • QoE Archive SQL Server Name: This is read-only field and fixed to the fully qualified domain name of the local machine. Cube can be installed only from the machine that has QoE Archive database (Note. Cube itself may be installed on a remote machine. See below)
  • QoE Archive SQL Server Instance: SQL Server instance name for where the QoE Archive DB is located. To specify a default SQL Server instance, leave this field blank. To specify a named SQL Server instance, enter the instance name (e.g. the name after the “\”). If QoE Archive component was selected for the install, this field will be pre-populated with the value provided on the QoE Archive Configuration page.
  • Cube Analysis Server: SQL Server Analysis Service instance name for where the cube is to be created. This can be a different machine but the installing user has to be a member of Server administrators of the target SQL Server Analysis Service instance.
  • Use Multiple Partitions: The default is set to “Multiple partition”, which requires Business Intelligence edition or Enterprise edition of SQL Server. For Standard edition, select “Single Partition” option. Note that cube processing performance may be impacted if Single Partition is used.
  • Cube User – User Name & Password: Domain service account name and password (masked) that will trigger the cube processing. If QoE Archive component was selected for the install, this field will be pre-populated with the value provided on the Archive Configuration page for the SQL Agent Job User, but we recommend specifying a different domain service account so that Setup can grant the least required privilege to it.

image

9. When clicking next, another round of validation will be performed and any issue will be reported. Upon successful completion of the validation, the installer will go to the Portal Configuration page.

10. At Portal Configuration page, provide the following information:

  • QoE Archive SQL Server: SQL Server instance name for where the QoE Archive database is located. Note that unlike the QoE Archive Configuration page and the Cube Configuration page, the machine name is not fixed and must be provided. If QoE Archive component was selected for the install, this field will be pre-populated with the value provided on the QoE Archive Configuration page.
  • Cube Analysis Server: SQL Server Analysis Service instance name for where the cube is located. If Cube component was selected for the install, this field will be pre-populated with the value provided on the Cube Configuration page.
  • Repository SQL Server: SQL Server instance name where the Repository database is to be created. If the SQL Server instance name for where the QoE Archive database is located has been provided earlier in the setup (in other components), this field will be pre-populated with the QoE Archive DB SQL Server instance name. This can be any SQL Server instance.
  • Repository Database: By default the option is set to “Create new database”. Since Repository DB upgrade is not supported, the only circumstance under which the “Use existing database” option can be used is if the existing Repository DB has the same schema as the build to be installed.
  • IIS App Pool User – User Name & Password: The account that the IIS application pool should execute under. The User Name and Password fields will be grayed out if built-in system accounts are selected. These fields will only be enabled if “Other” is selected from the drop down box so the user can enter the domain service account information.

imageimage

11. When clicking next, the final round of validation will be done to ensure that the SQL Server instances are accessible using the credentials provided and that IIS is available on the machine. Upon successful completion of the validation, the installer will proceed with the setup.

image

12. When the installer is done, most likely the SQL Server Agent job will be in progress, doing the initial load of the QoE data and the cube processing. Depending on the amount of data in QoE, the portal will not have data available for viewing yet.

13. The main portal page is accessible via http://<machinename>/CQD

image

image

image

Known Issues and notes from the deployment in my Lab environment:

  • If you decided to install the CQD on the same server that host the existing Skype for Business SQL Reporting service, be aware the the Default Web Site is already reserved for the reporting service and therefore you’ll need to change default Web site binding port.
  • If you decide to go forward with Multiple partition, make sure the SQL instance is configured as ENTERPRISE edition and has the Analysis service running
  • If you have SQL Server 2008 R2 STD, make sure you upgrade it to SP2
  • Make sure the SQL Agent Service for the instance is running
  • Restart the SQL services / server before installing the CQD or after upgrading to ENT, otherwise the CUBE won’t allowed to continue in setup
  • QoE data and the cube processing may take some time for initially load the data using the existing stored procedure.
  • Some advanced configuration are required for setting authorization and access rules, those are detailed explained in the following URL: https://technet.microsoft.com/en-us/library/mt126252.aspx
  • After users are authenticated by IIS, they will have to have file permissions on the CQD directory in order to access the web portal content. It is possible to change the ACLs through the security tab of the CQD directory properties to add individual users or groups; however the recommended approach is to leave the file permissions untouched. Instead, change the IIS setting to use the IIS worker process to access the CQD directory no matter which user is authenticated.

image

image

  • In rare cases, the installer fails to create the correct settings in IIS. Manual change is required to allow users to log into the CQD and change the default authentication configurations and enable Extended Protection on the Windows Authentication Advanced tab:

Deploy Call Quality Dashboard

image

those steps needs to be repeated for each of the “CQD”, “QoEDataService”, and “QoERepositoryService” entries below “Default Web Site”.

Additional Sources:

Download: Skype for Business Server 2015, Call Quality Dashboard Call Quality Dashboard for Skype for Business Server 2015 Deploy Call Quality Dashboard for Skype for Business Server 2015 Plan for Call Quality Dashboard for Skype for Business Server 2015
Filed under: Lync, Skype for Business Tagged: Archive, Call Quality Dashboard, CQD, Lync Server 2013, Reporting, Skype for Business Server 2015

Kressmark Unified Communications: Microsoft Ignite 2015 - On twitter

$
0
0
I really like twitter, it is fast, easy and fun. So during Ignite (and other events I go to) I tend to tweet and retweet quite a lot. Twitter is also fun for the statistics you can get from it. Toni Pohl created a very nice summary of what was happening on the #MSIgnite hashtag during Ignite.

Since the 2nd of May untill May 10th there were almost 109.000 tweets containing #MSIgnite sent by approximately 17.000 Twitter users. A rough estimate gives that #MSIgnite should have reached at least some 5 million users. I sent around 1000 tweets and retweets during the event and this made me the second most active tweeter during Ignite.

Follow me on Twitter at @mkressmark

Another great use of twitter came from companies in the expo hall telling people to take pictures or tweet to certain hashtags and their followers of course. I tried to win a trip to Australia in a contest hosted by Recordpoint, but I did not make it, instead I won a license from Landis Computer.

The Skype for business team arranged a live competition on twitter on the hashtag #Skype4BTrivia, which I unfortunately missed. However, there were some nice questions and answers in that competition which I will reiterate here. See if you know the answers without cheating, have fun!

Questions

1. When was the official announcement made that Lync would become Skype for business?
2. Where was the last Lync Conference held before Microsoft Ignite?
3. What is the name of the default Skype for business font?
4. Which version of the product introduced the concept of Public IM Connectivity (PIC)?
5. What was the codename for Lync Server Control Panel?
6. What command would be used to return a Skype for business server to service after performing maintenance?
7. What is the new server role introduced in Skype for business?
8. When did Microsoft overtake Cisco in the leaders position of Gartner's magic quadrant for UC?
9. Which Skype for business port and protocol is used for incoming SIP requests for IM?
10. What is the default video codec for Skype for business?
11. When moving a user to a new pool using PowerShell, what is their new pool referenced as?
12. What is the sum of the PSTN country codes for these two countries (identified by their flags below - (Netherlands and Italy))?
13. Where can you see address book normalization rules in Skype for business?
14. In the Skype for business client, what is the default ring tone for Private Line?
15. What feature does call monitor NOT provide?

Questions?

And answers!

Answers

1. November 11, 2014
2. Las Vegas
3. Segoe UI
4. Live Communications Server 2005 Sp1
5. Bigfin
6. Invoke-CsComputerFailback
7. Video Interoperability Server
8. August 4, 2014
9. 5062 UDP
10. H.264/MPEG-4 Part 10
11. -Target
12. 70 (31 + 39)
13. Get-AddressBookNormalizationRule
14. Duotone
15. Hold/Unhold

Congratulations to the winner Brett Ondrey (@Xabulon)!

Viewing all 4272 articles
Browse latest View live